Vision Tutorial
This tutorial will help you get started with computer vision on the Raspberry Pi. First we will get you up and running by learning to take images using OpenCV and python, then we will go through some image processing methods which you may find useful for your final project.
OpenCV Python Basics
This part of the tutorial is designed to help you get started with capturing images and using OpenCV on the Raspberry Pi. Throughout this tutorial, we will be using python 3 and a Raspberry Pi camera however for your project you may use any programming language or camera you like.
Importing Libraries
The main libraries which you need to be familiar with for the vision component of your task are the OpenCV (open source computer vision) and numpy (numerical python) libraries. Both libraries have been pre-installed on your Raspberry Pi for you (OpenCV can take hours to install), however if for any reason you do need assistance installing these at any stage, we are happy to guide you through it.
To import these libraries, you should have the following at the top of each script:
import cv2
import numpy as np
The Camera Object
The next step is to create your camera object. There are 2 modules that you can use for this; the picamera module, or OpenCV’s inbuilt cv2.VideoCapture() module. There are advantages to using either method. The picamera module offers more control of the image but cv2.VideoCapture() will work with any camera. So it is up to you to decide which module you would like to use for your project. Below we offer an example of using both approaches. Raspberry Pi camera basics, OpenCV basics.
import time
import picamera

with picamera.PiCamera() as camera:
	camera.resolution = (1024, 768)
	camera.start_preview()
	# Camera warm-up time
	time.sleep(2)
	camera.capture('foo.jpg')
# See https://picamera.readthedocs.io/en/release-1.10/recipes1.html
cap = cv2.VideoCapture(0) # Connect to camera 0 (or the only camera)
cap.set(3, 320) # Set the width to 320
cap.set(4, 240) # Set the height to 240
ret, frame = cap.read() # Get a frame from the camera
# See https://docs.opencv.org/3.0-beta/modules/videoio/doc/reading_and_writing_video.html#videocapture-setDisplaying Frames Using OpenCV and Python
Now you have called the function to read a frame in from the camera, and stored the data in your ‘frame’ variable, you may wish to display your image. The ‘ret’ variable you just created will tell you whether or not the frame was successfully obtained, so first you must ensure the read was a success. Then, you can use the OpenCV cv2.imshow() function to display your frame!
if ret == True:				     # Check if data was obtained successfully
	cv2.imshow("CameraImage", frame)     # Display the obtained frame in a window called "CameraImage"
	cv2.waitKey(0)			     # Make the program wait until you press a key before continuing.

# Please note: cv2.waitKey() must be called for cv2.imshow to display.
# The input parameter to the cv2.waitKey() function is the wait time delay in milliseconds.
# If you do not want infinite delays (0 = wait forever), simply put a 1 or other millisecond
# value in the brackets instead.
If we wanted to save this image, we could add a save step after obtaining the image.
cv2.imwrite("frame0001.png", frame) # Save the frame as frame0001.pngThe Clean Up Step
To ensure a clean exit of your program, there are a couple of things you should do at the end of your script. Since we have opened an instance of the camera object and some pop-up windows using OpenCV, we need to close these prior to termination of the program. The following functions should be at the end of each vision script you run.
cap.release()			# Release the camera object
cv2.destroyAllWindows()		# Close all opencv pop-up windows
OpenCV Image Processing
Now you have had the change to read in an image using python and opencv on your Raspberry Pi, you can start looking at the image processing steps you may want to use in your project. This part of the tutorial will present a range of different image processing methods which you may find helpful.
Changing Colour Spaces
Typically, images are captured using a derivative of the RGB colourspace, however there are many other colourspaces available for you to test as well. The default frame input will be read as BGR (blue, green, red) using the cv2.VideoCapture or picamera modules. Changing colourspaces after obtaining an image is quite simple using OpenCV, and examples of this are presented below.
hsv_frame = cv2.cvtColor(frame, cv2.COLOR_BGR2HSV) 		# Convert from BGR to HSV colourspace
lab_frame = cv2.cvtColor(frame, cv2.COLOR_BGR2Lab) 		# Convert from BGR to Lab colourspace
For other colour spaces, such as YUV etc., refer to the following guide to obtain the code to pass into the cv2.cvtColor() function, OpenCV cvtColor docs.
Splitting Colour Channels and Creating Regions of Interest
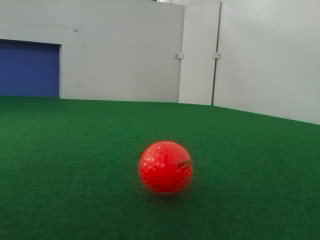
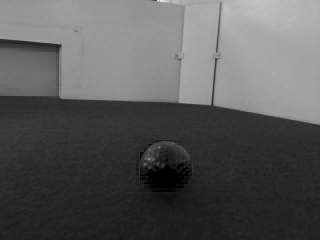
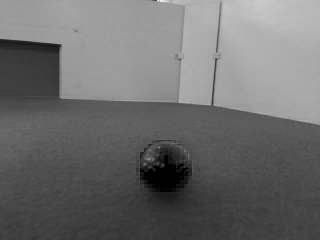
It may be useful to operate independently with single-colour channels, or regions of interest within images. Extracting a single colour channel will produce a grayscale image which can be used for many image processing applications. For example, let's analyse the example frame below (resolution set to 320 x 240);
b, g, r = cv2.split(frame)		# Split the frame into its 3 colour channels
b = b*0					# Set the blue pixels to zero
g = g*0					# Set the green pixels to zero
frame = cv2.merge((b, g, r))		# Merge the channels back into one image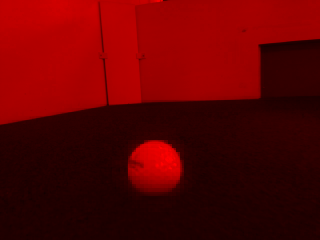
You may also need to be aware that there is a high computational cost of merging channels, so this should be avoided if possible. An alternative to the OpenCV process can be achieved using numpy arrays, as shown below. Note: OpenCV reads images into python as numpy arrays. Images stored in numpy arrays are represented with 3 elements, being [rows, columns, colour_channels].
frame[:, :, 0] = 0 # Set colour channel 0 (blue) to 0You may also wish to extract a region of interest from an image at some stage. This can be done by indexing the numpy array. For example, to extract a 100 by 100 pixel region within a frame and double the blue channel values;
sub_frame = frame[200:300, 200:300, 0]		# Extract blue colour channel of a 100 pixel region
sub_frame = sub_frame * 2			# Double the pixel blue channel values
frame[200:300, 200:300, 0] = sub_frame		# Replace the region in the original image with our sub frame
Image Segmentation
Image segmentation is the division of an image into regions or segments which correspond to different objects within the image and is a critical step in most image analyses. In OpenCV there are many approaches to image segmentation.
Simple thresholding can be completed using the cv2.threshold() function, which takes the following format;
ret, dst = cv2.threshold(src, thresh, maxValue, type)In this function, the parameters have the following meanings:
dst 		→ 		The output image
src 		→ 		The input image (this should be a grayscale image)
thresh 		→ 		The threshold value
maxValue 	→ 		A maximum value, used for binary thresholding
type 		→ 		The thresholding method being used (see here for parameter options)
For more details regarding the threshold function, see the documentation at OpenCV cv2.threshold() docs. An overview of the mathematics behind various thresholding methods is provided here OpenCV thresholding methods docs.
For example, we may wish to threshold the blue channel of an image such that
- all pixels > 127 are set to 255
- all pixels < 127 are set to 0
We would first extract the colour channel we wish to analyse (which will display as a grayscale image). We can then threshold this channel using the binary thresholding method with a threshold of 127;
import io
import time
import picamera
import cv2
import numpy as np

# Create the in-memory stream
stream = io.BytesIO()
with picamera.PiCamera() as camera:
	time.sleep(2)
	camera.capture(stream, format='jpeg')

# Construct a numpy array from the stream
data = np.fromstring(stream.getvalue(), dtype=np.uint8)

# "Decode" the image from the array, preserving colour
frame = cv2.imdecode(data, 1)

frame_blue = frame[:,:,0];							# Extract blue channel
ret, thresholded_frame = cv2.threshold(frame_blue, 127, 255, cv2.THRESH_BINARY)	# Threshold blue channel

cv2.imshow("Binary Thresholded Frame", thresholded_frame)			# Display thresholded frame
cv2.waitKey(0)									# Exit on keypress

cap.release()
cv2.destroyAllWindows()
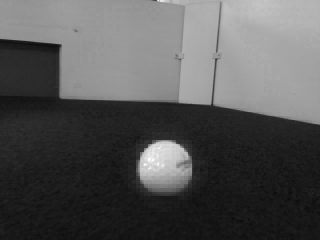
The effect of this script on an input frame can be seen below, where the left image is the input image, the middle frame is the blue colour channel, and the right image is the thresholded frame.
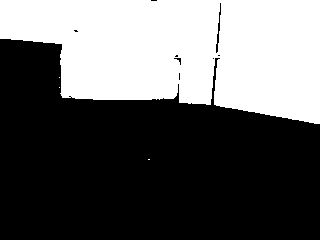
As you can see from the above images, our thresholding is clearly not adequate to segment the image for blue regions (since we highlighted the walls, not the blue goal). To correctly extract the blue goal, we should change this threshold and maybe consider using range based thresholding (pixels between 127 and 190, for example), or converting to a different colourspace.