EGB320 Python Robot Library Documentation
EGB320 VREP FilesThe documentation for the EGB320 lunarbot_lib.py file which wraps the VREP Python API can be found here.
RoverBot Python Module Functions
There are only 8 functions within the RoverBot Python Module that you will need to call.
StartSimulator(): The StartSimulator function starts the VREP simulator. This is the same as manually pressing the Play button within VREP.
StopSimulator(): The StopSimulator function stops the VREP simulator. This is the same as manually pressing the Stop button within VREP.
SetTargetVelocities(x_dot, theta_dot): The SetTargetVelocities function sets the robot's linear speed in the x direction with respect to the robot's coordinate frame and the robot's rotation velocity. The linear speed, x_dot, is in m/s while the rotation velocity, theta_dot, is in rad/s. The maximum and minimum values you can set are based on the robot parameters, see Robot Parameters. Example function usage:
# move the robot at a forward velocity of 0.1m/s with a rotational velocity of 0.5 rad/s.
RoverBotSim.SetTargetVelocities(0.1, 0.5)GetDetectedObjects(): The GetDetectedObjects function takes no arguments and returns, as 4 variables in order, the range and bearing to the sample, the lander, any obstacles and then rocks if they are within the camera's field of view (FOV). The range and bearing is returned as a 2 element array. If the object is not within the field of view that respective return variable will be set to none. How far the away the objects can be detected is based on the robot parameters, see Robot Parameters. Only sample-obstacle occlusion is currently implemented. Example function usage:
sampleRB, landerRB, obstaclesRB, rocksRB = RoverBotSim.GetDetectedObjects()

# Check to see if the sample is within the camera's FOV
if sampleRB != None:
	sampleRange = sampleRB[0]
	sampleBearing = sampleRB[1]

# Check to see if any obstacles are within the camera's FOV
if obstacles != None:
	# loop through each obstacle detected using Pythonian way
	for obstacle in obstaclesRB:
		obstacleRange = obstacle[0]
obstacleBearing = obstacle[1]GetDetectedWallPoints(): The GetDetectedWallPoints function takes no arguments and returns a single variable that holds any detected wall points as a list of list containing the range and bearing to each wall point. The list will either contain 1, 2 or 3 range-bearing arrays depending on the situation, for the 3 scenarios see Wall Point Scenarios. The returned variable will be none if there are no wall points detected (i.e. the robot is to close to a wall).
# detect any wall points, check to make sure not to close to the wall
wallPoints = RoverBotSim.GetDetectedWallPoints()
if wallPoints == None:
	print("To close to the wall")
else:
	# print the range and bearing to each wall point in the list
	for point in wallPoint:
		print("Wall Point (range, bearing): %0.4f, %0.4f"%(point[0], point[1]))
DropSample(): The DropSample function attempts to drop the sample at the current position. Example function usage:
# Attempt to drop the sample at current position
RoverBotSim.DropSample()SampleCollected(): The SampleCollected function takes no arguments and returns true if the sample is within the robot's collector, false if it is not. Example Usage:
# check to see if sample is in collector
if RoverBotSim.SampleCollected() == True:
	# # Attempt to drop the sample at current position
RoverBotSim.DropSample()UpdateObjectPositions(): The UpdateObjectPositions function does two things. Firstly it updates internal class variables holding the position of the various object within the scene (i.e. sample and lander). Secondly it emulates the collector by randomly "releasing" the sample. How often the sample is randomly released from the "collector" is based on a passed robot parameter (default is 1.0 which never releases sample). This function should be called once within each iteration of the main code loop.
 while True:
	 # Navigation/AI Code - Get detected objects, and set robot velocities etc.

	# Update the sample position in each loop
RoverBotSim.UpdateObjectPositions()GetCameraImage(): The GetCameraImage function grabs the a single image from a buffer of images streamed from the vision sensor. Due to api limitations this may be a delayed image. (see the teaching team for a way to rectify this with additional code). An example snippet of code for capturing an image and converting it to a cv2 image format is shown below.
resolution, image = RoverBotSim.GetCameraImage()
if image != None:
	cv2_image = np.array(image,dtype=np.uint8)
	cv2_image.resize([resolution[1],resolution[0],3])
	frame = cv2.cvtColor(cv2_image, cv2.COLOR_BGR2RGB)
Scene and Robot Parameters
Scene Parameters
The scene parameters allow you to set the starting position of the sample and the position of the 3 static obstacles. The robot will always start within the center of the arena within the VREP simulator. The following example shows how to set the starting position of the sample and the static obstacle positions. Setting the sample and obstacle starting positions to -1 will allow you to manually set the positions within VREP.
 # SET SCENE PARAMETERS
sceneParameters = SceneParameters()

# Set the sample's starting position [x, y] (in metres),
# or set to -1 if want to manually set the position of the sample using VREP controls
sceneParameters.sample0_StartingPosition = [0.5, 0.2]
sceneParameters.sample1_StartingPosition = -1
sceneParameters.sample2_StartingPosition = -1

# Set the position of the obstacles [x, y] (in metres), specify None if not wanted in the scene,
# or set to -1 if want to manually set the obstacle positions using VREP controls
sceneParameters.obstacle0_StartingPosition = [0.7, 0.7]
sceneParameters.obstacle1_StartingPosition = None
sceneParameters.obstacle2_StartingPosition = -1

# Set the position of the obstacles [x, y] (in metres), specify None if not wanted in the scene,
# or set to -1 if want to manually set the obstacle positions using VREP controls
sceneParameters.rock0_StartingPosition = [0.3, 0.4]
sceneParameters.rock1_StartingPosition = None
sceneParameters.rock2_StartingPosition = -1
Robot Parameters
The robot parameters allow you to set the minimum and maximum linear (forward) speed the robot can move, how far the vision system can detect the various objects, the quality of the collector, and the position of the camera. We suggest you try and simulate your real robot as much as possible to eliminate as many integration bugs as possible. You will need to get these parameters from your various team members. The following example shows you how to set the various parameters.
# SET ROBOT PARAMETERS
robotParameters = RobotParameters()

# Drive Parameters
robotParameters.driveType = 'differential'		# specify if using differential or omni drive system
robotParameters.minimumLinearSpeed = 0.04  		# minimum speed at which your robot can move forward in m/s
robotParameters.maximumLinearSpeed = 0.25 		# maximum speed at which your robot can move forward in m/s
robotParameters.driveSystemQuality = 1			# specifies how good your drive system is from 0 to 1
							# (with 1 being able to drive in a perfectly straight line)

# Camera Parameters
robotParameters.cameraOrientation = 'landscape'		# specifies the orientation of the camera
robotParameters.cameraDistanceFromRobotCenter = 0.1 	# distance between the camera and the center of the robot
robotParameters.cameraHeightFromFloor = 0.03 		# height of the camera relative to the floor in metres
robotParameters.cameraTilt = 0.17 			# tilt of the camera in radians

# Vision Processing Parameters
robotParameters.maxSampleDetectionDistance = 1 		# the maximum distance you can detect the sample in metres
robotParameters.maxLanderDetectionDistance = 2.5 		# the maximum distance you can detect the lander in metres
robotParameters.maxObstacleDetectionDistance = 1.5 	# the maximum distance you can detect the obstacles in metres

# Collector Parameters
robotParameters.collectorQuality = 1 			# specifies how good your collector is from 0 to 1.0
							# (with 1.0 being awesome and 0 being non-existent)
robotParameters.autoCollectSample = True #specifies whether the simulator automatically collects samples if near the collector
robotParameters.maxCollectDistance = 0.03 #specifies the operating distance of the automatic collector function. Sample needs to be less than this distance to the collector
Wall Point Scenarios
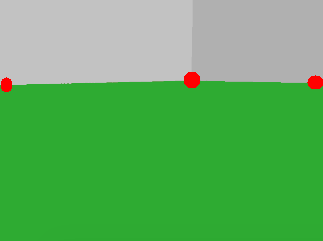
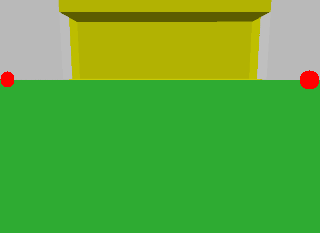
Wall points are only detected on the vertical edges of the image. However, if a corner of the field is within view then a third wall point will be detected at the corner, see three wall points case below.
One wall point will be detected when the robot is close to the wall but not directly facing it.

Two wall points will be detected when the robot is not close to the wall but no arena corner is within the field of view.
Three wall points will be detected when the robot is not close to the wall and an arena corner is within the field of view.