General EGB320 Hardware Introduction
This tutorial is to provide you with some general information regarding the hardware you will use within your design project. This guide will mainly discuss the Raspberry Pi and some crucial Do's and Dont's. Please see the Setting Up Your Raspberry Pi guide for help on setting up your Raspberry Pi. However, we strongly suggest you read this page first as it contains important information.
What is Linux
You may be wondering why are we discussing Linux. Well the Raspberry Pi, the hardware provided to you in EGB320, uses Linux. Linux is an open source operating system (OS) and there are many versions such as Ubuntu, Debian and Mint. In other words it is very similar to the various Windows (XP, 7, 10 etc.) and Mac (OS X, Sierra etc.) operating systems. The Linux OS has pros and cons, just like the Windows and Mac OS's. The main advantage of Linux, besides being open source and free, is that it allows for easy development of virtually any software in any language.
Introducing Your EGB320 Kits
Each team will receive an EGB320 Kit during second week of semester. This kit contains the following items;
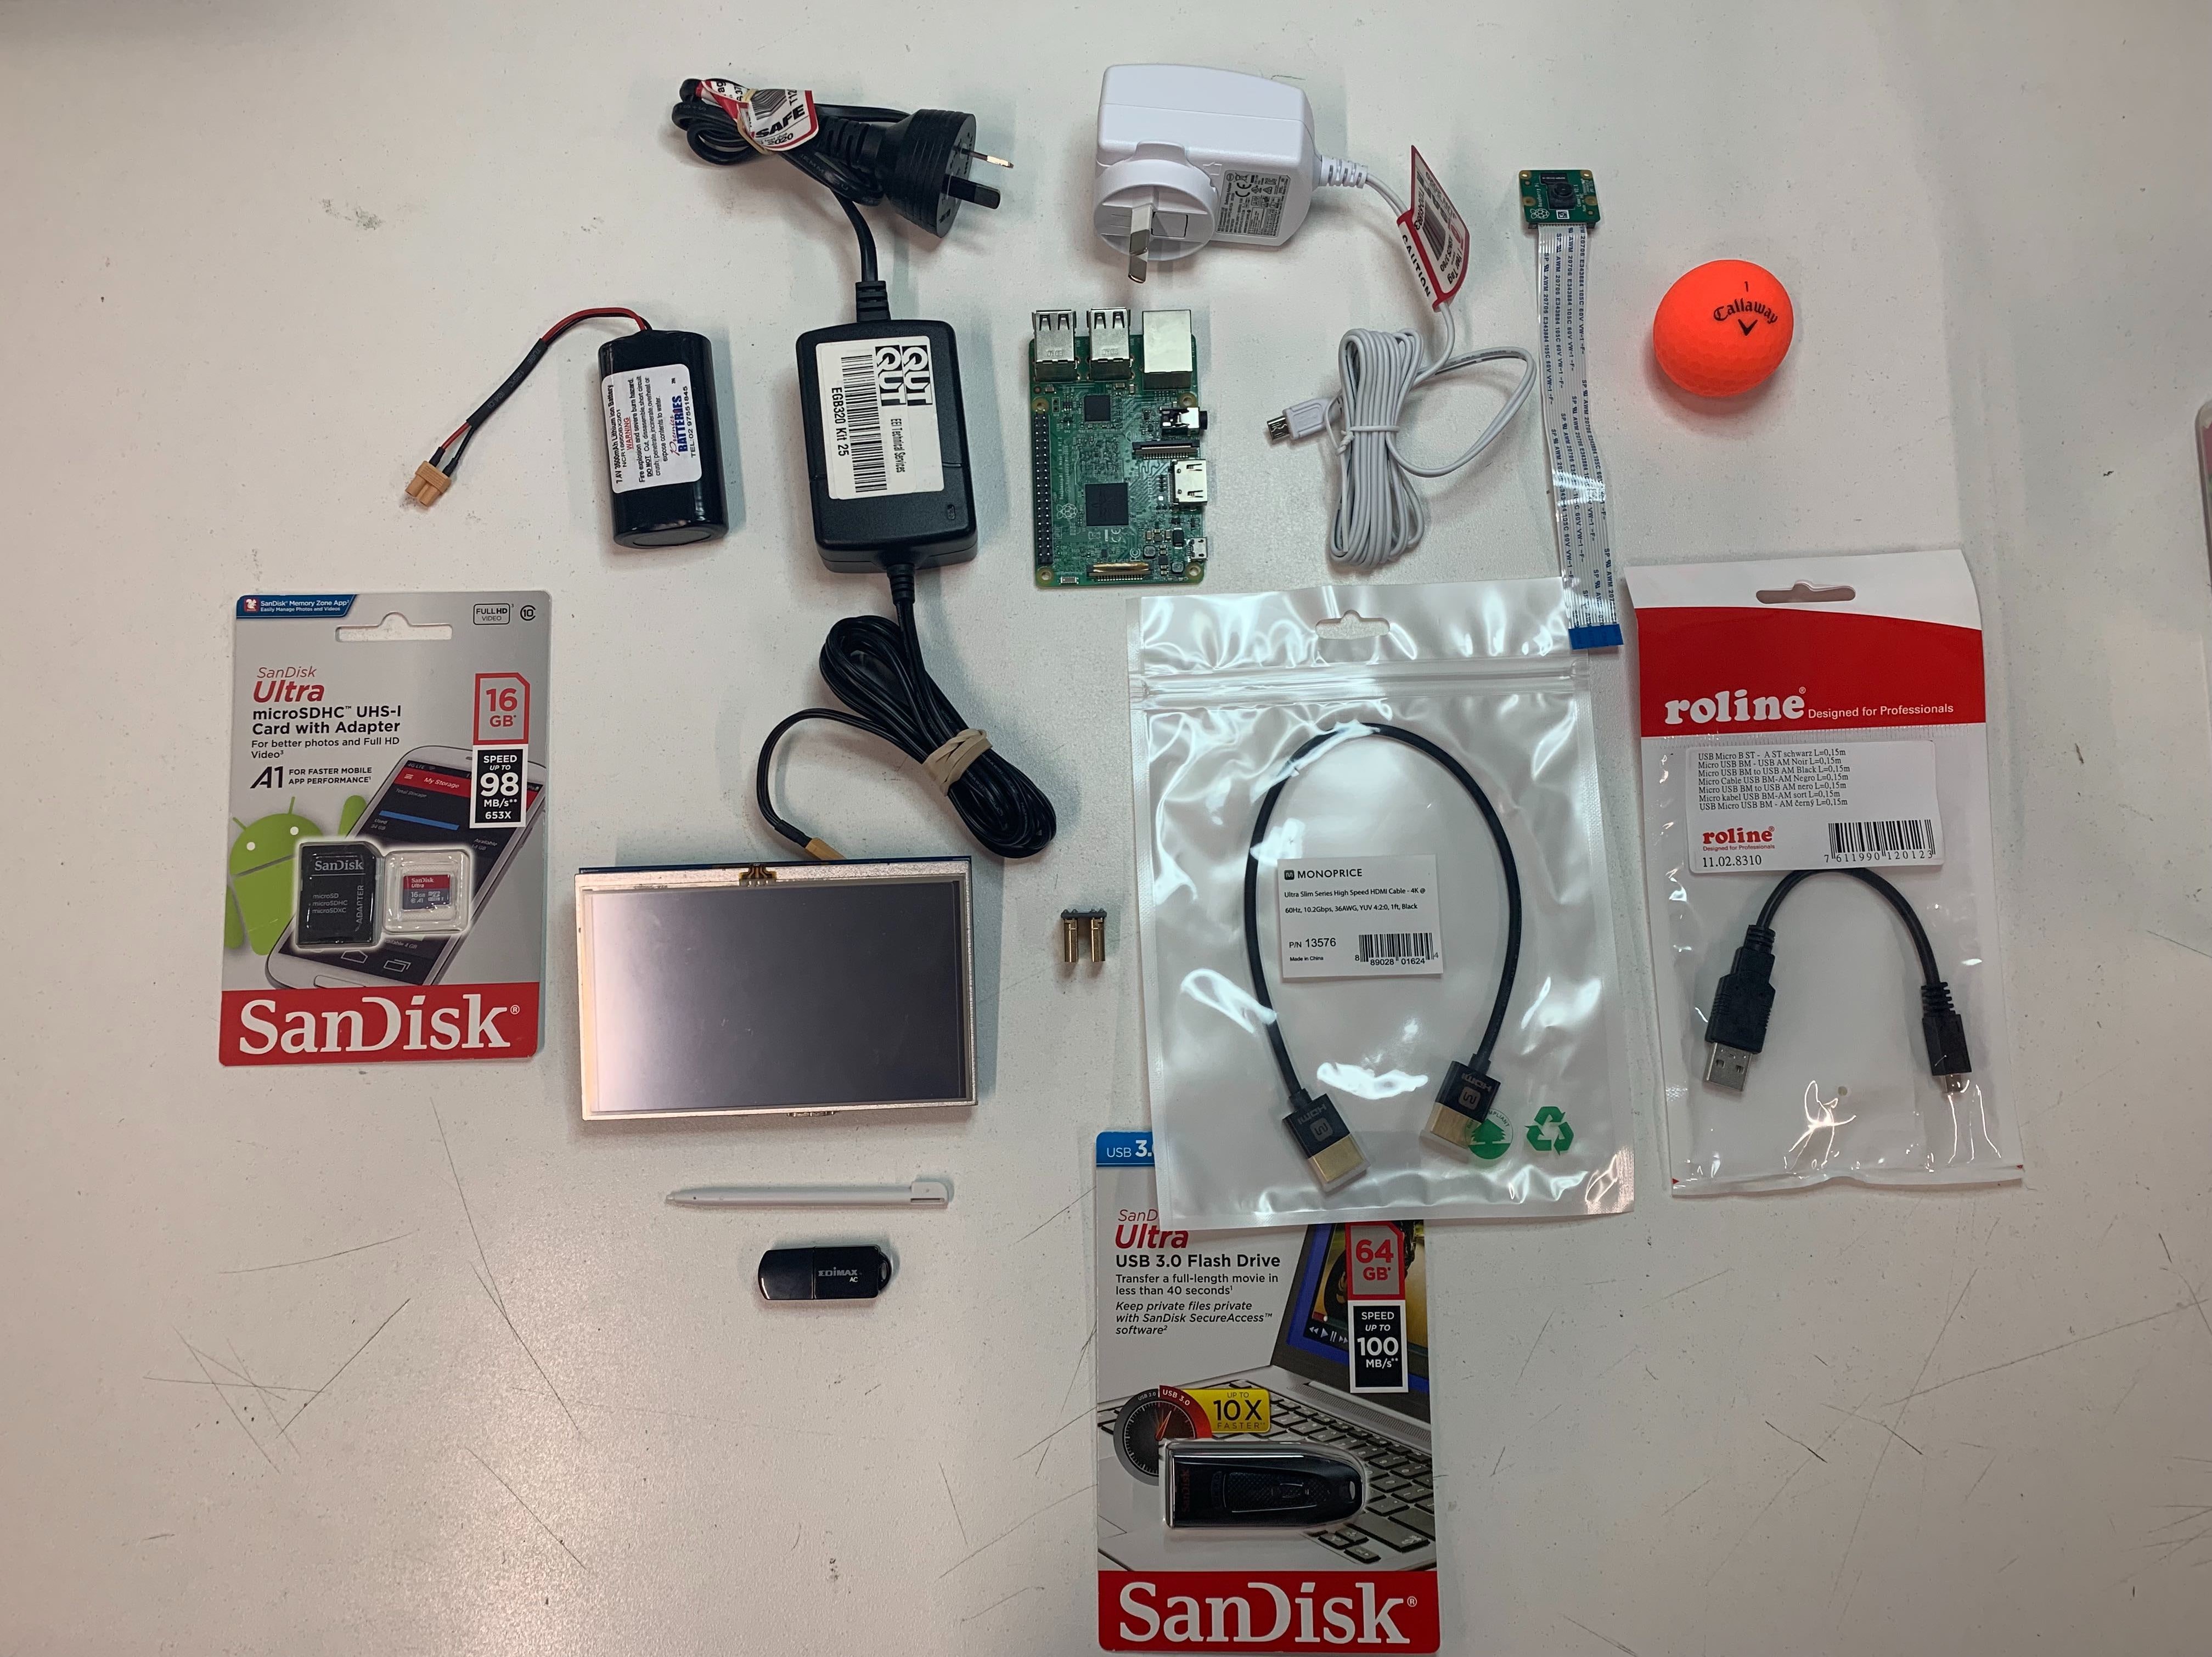
- 1x Raspberry Pi 3B+
- 1x Raspberry Pi Charger
- 1x Raspberry Pi Camera Version v2
- 1x 16GB SD Card (Blank)
- 1x 64GB USB3.0 Flash Drive
- 1x 5 Inch LCD Touchscreen
- 1x HDMI to HDMI Adapter Board
- 1x 6" HDMI cable
- 1x Touchscreen Stylus
- 1x 5V 2.1A Wall Wort with Micro USB Power Connector
- 1x Orange Golf Ball
- 1x 2-Cell 7.4V 3500mAh 6A max draw Lithium Ion Battery with XT30 connector
- 1x Battery Charger
- 1x Edimax 5G WiFi Dongle
- 1x Breadboard
- 1x Misc Consumable Electronics (Resistors, LEDs, Switches, Prototyping wires etc)
Remember it is up to you and your team to take care of your kit and to ensure a full kit is returned at the end of the semester. We highly recommend you label the provided Raspbery Pi power supply, battery and battery charger, preferably with the same number as the number on the kit barcode.
What is a Raspberry Pi
A Raspberry Pi is a single-board computer and was developed as an educational tool. You can think of it as a low-power, compact computer. The system architecture used by the Raspberry Pi is different to that of your standard computer; desktop machines operate on an x86 architecture, while your Raspberry Pi uses the ARM architecture. This means any software compiled (e.g. a C software program) for your laptop/desktop that you wish to use on the Raspberry Pi needs to be recompiled for the ARM architecture. However, since the teaching team have already configured a Raspberry Pi OS image for you, it is unlikely you will need to worry about the difference in architecture. If you are interested, the specifications of the Raspberry Pi 3B+ are:
- Quad Core 1.4GHz Broadcom BCM2837B0 64bit CPU
- 1GB RAM
- 2.4GHz and 5GHz IEEE 802.11.b/g/n/ac wireless LAN, Bluetooth 4.2, BLE
- Gigabit Ethernet (300 Mbps)
- 40-Pin Extended GPIO
- 4x USB 2.0 Ports
- 4 Pole Stereo Output and Composite Video Port
- Full-Size HDMI Port
- CSI Camera Port for Connecting a Raspberry Pi Camera
- DSI Display Port for Connecting a Raspberry Pi Touchscreen (the touchscreen we provided is not a Raspberry Pi specific touchscreen).
- Micro SD Port for Loading your Operating System and Storing Data
- Upgraded Switched Micro USB Power Source up to 2.5A
- Power-over-Ethernet (PoE) support (requires separate PoE HAT)
For more information about the Raspberry Pi check out the Raspberry Pi website.
Capabilities of a Raspberry Pi
A Raspberry Pi has essentially the same capabilities as your desktop computer, simply at a lower performance. You can write your own software in any standard language, including Python, Javascript or C/C++. Many people actually utilise a Raspberry Pi and a Game Console Emulator (i.e. a Nintendo64 Emulator) to recreate classic consoles and play retro arcade games.
The Raspberry Pi has some microcontroller-like capabilities as well. For example, it can output digital signals (i.e. turn on/off a LED), read digital signals (i.e. read a digital sensor or switch), or communicate with other devices via SPI, I2C or UART. All these capabilities are performed through the software controlled General Purpose Input/Output (GPIO) pins. However, please note that while many people believe the Raspberry Pi can perform Analogue to Digital Conversions (ADC), this is not true as the Raspberry Pi has no ADC hardware. Another thing to note is that while the Raspberry Pi has microcontroller-like capabilities, but with greater computational power, the Raspberry Pi is not a microcontroller.
Capabilities Applicable to EGB320
The following capabilities are applicable to your EGB320 project;
- Outputting digital signals (including PWM signals) to turn on LEDs, control motors and trigger lifting mechanisms.
- Reading digital signal outputs from digital sensors.
- Creating Python Scripts to utilise the processing capabilities of the Raspberry Pi to perform image processing and control your robot's movements.
The Do's and Dont's
GPIO Pins Do's and Dont's
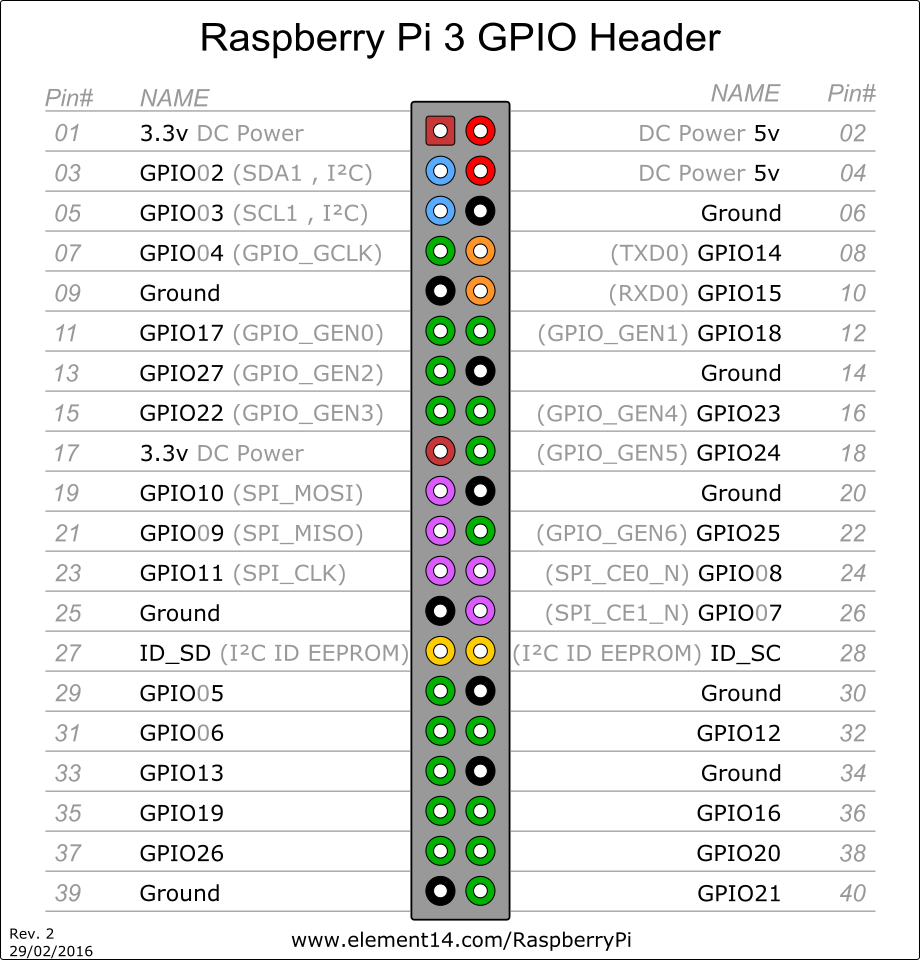
Over the years several groups have destroyed their Raspberry Pi at critical times, so we ask you please read the following Do's and Dont's carefully. The two main things to note are that the GPIO pins are not placed on the board in numerical order (i.e. GPIO pin 3, is not pin 3 on the board), and that they operate at 3.3 volts. This means the GPIO pins can only output 3.3V, and your digital signals being input to the Raspberry Pi should only be 3.3V. Additionally, the standard maximum output of the Raspberry Pi is 8mA, which can be altered to an absolute maximum of 16mA by changing some settings. For more information regarding the GPIO check out the official Raspberry Pi GPIO Documentation.
Please note, the GPIO pins can be referred to by two separate naming schemes. See the GPIO Python Introductory Guide for more details regarding pin naming conventions. There are also 3.3V, 5V and Ground (GND) rails within the GPIO pin header. These can be used to power additional components, such as a touchscreen or a digital sensor. The 3.3V and 5V rail can both supply a maximum current of approximately 200mA.
The Do's
- Check you are connecting to the correct GPIO pin. Remember to double check the pin's position, and which naming convention you are using (BCM vs. BOARD).
- Ensure any signals going to the GPIO pins are no larger than 3.3V
- Only use the GPIO pins for small current signals.
The Dont's
- Send more than 3.3 volts to a GPIO pin.
- Do not use a GPIO pin to control a motor directly. Instead you will need to send PWM signals to a motor driver.
- Do not put power into the 5V or 3.3V rails. This bypasses the Raspberry Pi's protection circuitry. The only way you should be powering your board is through the micro USB connector, plugged in with the supplied wall power adapter or through a 5V regulated battery circuit.
Raspberry Pi Camera Do's and Dont's
The Raspberry Pi Camera is fairly robust, however the cable is not. So you need to ensure that you take care of the supplied ribbon cable and do not bend it at sharp angles. Additionally, past teams have had a working vision system and then altered their robot in some way (e.g. changed the camera's orientation or put a piece of clear acrylic in front of it), which has drastically reduced the performance of their vision system. Be wary of last minute changes involving sensors, as you will also need to factor in time to modify your software systems.
Battery Safety
It is paramount you take care of your battery and the provided charger. Purchasing a replacement for either of these components costs $45 per item. The reason these components are so expensive is because they have inbuilt protection circuitry to prevent certain issues (i.e. over charging/dis-charging). However, despite the inbuilt protection circuitry, you must not leave your battery unattended while it is charging.